
Larval Density Sample Processing Protocol
Written by Jon Puritz, Amy Zyck and Maggie Schedl
Updated by Alex Hooks, Julianna Bucci, Amy Zyck, and Megan Guidry
Original copy made: March 2019
Edits made: May 2023 (AZ), October 2023 (MG)
Larval Density Counts, Videos, and Size Imaging
Equipment:
- 1 mL pipette and tips
- Sedgewick rafter slide for formalin
- Hand counters (3)
- Lab binder with data sheets
- Compound scope (OMAX Scope)
- Lab computer with ToupView program
- 1.0 Molar HCl
- Chemical hood (if using HCl)
- Squirt bottle with Type II DI water
- DI H2O for rinses
- 50 mL falcon tubes (1 per sample)
- Kimwipes
Overview:
There are between ~3-6ml in each sample and each slide only holds 1ml. The vial will also need to be rinsed to remove all larvae that get stuck to the sides. Rinses should be performed until you get 0 larvae/slide for 2 consecutive slides.
Including rinses, you will likely be processing between 5-10+ slides per sample.
Processing each slide entails:
- Density count on microscope
- video and recount
- imaging for size analysis
- saving sample
I. Prep and set up
- Set up the compound microscope + lab laptop
- Navigate to your project folder (OneDrive-Puritz Lab of Marine Evolutionary Ecology/Documents/Projects/PROJECT_FOLDER) and make a folder for the sample you are about to process (ex. ARC2_CB1) in the appropriate population/spawn# folder. All the videos/pictures from today will be saved there.
- Open the count spreadsheet for the designated project and record sample info
II. Performing Density Counts on Compound Microscope
- Put on gloves and take samples out of 4 degree fridge (location will depend on the project)
- Take sample to the fume hood
-
Add 300 uL of 1.0 M Hydrochloric Acid (HCl) to sample vial, pipette to mix, and let sample sit for a few minutes*
*Important note: the volume of HCl added will depend on the volume of sample, so that a 1:10 ratio of HCl to sample volume is achieved
- Take 1 mL of sample from the bottom of the vial using p1000 micropipette
- Once you’ve processed the bulk of the sample volume, continue on to rinses
- To rinse, add ~1ml DI H2O to the vial, pipette to mix and load slide
- Repeat rinses until you count 0 larvae/slide for 2 consecutive slides - this may take some time
-
Set up the 1 mL Sedgwick Rafter slide so that the cover slip is on diagonally (see image below)

- Continuously push the sample onto the slide. Hesitating/stopping and going will create air bubbles that make slides more difficult to count. Check the tip of the pipette under microscope to make sure no larvae stuck inside or on tip.
- Straighten the cover slip over the slide. Load slide onto scope stage.
- Count the number of larvae on the entire slide using 4x objective lens (40x total magnification) using a counter.
- *Note: Do not look at the number you get on that counter (reduces chances of biased 2nd count).
- Count the following stages (some projects will only have 1 or 2 of these stages depending upon the age of the larvae):
- Embryos (these will be dark but perfectly round)
- Trochophores (dark oblong shape, possibly close to circular but with extra cellular bodies)
- Veligers (Should be classic D-shape clam-like shell with hinges or more rounded shell)
- Pediveligers (large with a visible eyespot on shell and possibly a visible foot)
- Abnormal larvae (any larvae that do not follow the shape descriptions above for each developmental stage)
- Make sure to count any larvae in overflow liquid around edges of the slide before you finish
- Set aside counter (without looking at it) to be recorded after video count.
III. Video and Recount (for Reproducibility)
For each slide you count, take a video of that slide and recount in real time using the following protocol…
- With the slide still on the stage, connect OMAX microscope camera to computer with ToupView Program via USB.
- Open ToupView Program and set up camera to record
- Select the camera you’re using listed under “Camera List”
- Sometimes, this function glitches and the camera will not open. Close the program, reopen, and try again. You may need to unplug the USB and plug it back in.
- Turn off auto exposure on the ToupView program and adjust microscope focus. The brightness also usually needs to be adjusted for a clear image.
- Select the camera you’re using listed under “Camera List”
- Position the slide so one whole corner is visible and click “Record” when ready to record this slide
- When you click “Record”, a pop up window will ask for a name for the video file as well as file location to save it
- general naming scheme: “SampleDate_ExperimentalBlock_Timepoint_Count#_Magnification” (ex. 20230425_ARC2_CB1_T0_c1_40x)
- Save files in the folder you made earlier for this sample vial on the PLOMEE OneDrive
- After naming the file and choosing location, click “Finish”.
- Record from one corner of the slide to the opposite diagonal corner
- Move the slide in a consistent direction (you pick, either across the rows or up and down columns) toward the diagonal corner
- it is best to move in small incremental scrolls rather than a slow continuous scroll (avoiding blurriness in the video)
- As you record, slowly count the larvae on the slide with a new counter.
- Each time you come across a larva, pause for a second and make sure the larva is in focus and you can see the edges of the grid cells
- After you finish counting the video, check the two counters to confirm the numbers match. If the numbers are different, recount the slide.
- Start recount on the microscope, and if that number is the same as original microscope count then recount (and retake) the video.
- Usually, looking again on the microscope will give you more time to really examine questionable/hidden larvae without having to worry about making the video too long.
- Record larval count in OneDrive spreadsheet and save updates.
- Double check you’ve recorded the counts properly and clear both counters.
IV. Imaging larvae for Size Measurements
For each sample you count, take images of at least 30 larvae plus any abnormal larvae. These can be from any slide, but it may be easier to start with the first slide.
- Begin with the slide still on the compound microscope and the magnification set to 100X
- In ToupView, set the following values (note: exposure time and gain will depend on the microscope lighting - adjust both as needed):
- Exposure Target = 120
- Exposure Time = ~3 ms
- Gain = 1.46
- Take photos of the first 30 normal larvae you see (a random sample)
- Always start from the same corner of the Sedgewick rafter - corner marked with black dot on Sedgewick rafter slide to avoid photographing the same larva twice
-
Make sure one side of the rafter square is completely in the image (example below)
- Take photos of any abnormal larvae you see, and write down the image number to be added to the spreadsheet (these are extra from the 30 normal larvae)
- Make sure to take photos of larvae that are orientated flat side up without anything obstructing the full larval body
- Once all 30 larvae are imaged plus any abnormal, Go to Save → Batch Save
- Save to the sample folder you made earlier
- Add a prefix with the sample date (recorded on sample vial) and sample name
- In cases where there are multiple larvae in one image, save the image with each larval number separated by an underscore (i.e., sampledate_sampleID.rafter-0001-0002.jpg)
- Example picture name: 20230425_ARC2_T0_CB1.rafter-0001.jpg
- After pictures are saved, use Paint or Preview(Mac) to go through the pictures with multiple larvae and add numbers in red font to denote larvae (this can be done once the entire sample is processed)
Notes:
- If any repeated images are taken of the same larvae, be sure to close the extra ones before saving the photos with Batch Save (to avoid duplicate images of the same larvae)
- It is okay to take a photo with multiple larvae in one cell, they will be marked once the photo is saved - just keep track of how many larvae have been photographed
V. Saving Sample after Counting and Imaging
- Label a 50 mL falcon tube with the sample ID, PROCESSED, today’s date, and your initials
- In the fume hood, set up the falcon tube in a tube rack with kimwipes and a DI water squirt bottle
- Once larvae are counted on the Sedgewick rafter slide, bring the slide to the fume hood
- Use the p1000 pipette to pipette the sample from the slide into the falcon tube
- Angle the slide and glass cover slip over the opening of the falcon tube and rinse into the falcon tube with DI H20
- Gently dry the slide and cover slip with kimwipes.
- After the last rinse is loaded into the Sedgewick rafter slide:
- check the pipette tip under the compound microscope for any larvae stuck to the sides of the tip
- If there is an internal paper label, use forceps to pull it out of the sample vial and check both sides under the dissecting scope (if necessary)
- The paper slip can be placed into a plastic petri dish when checking under the microscope
- Check the glass sample vial under the dissecting scope
- Once the entire sample is finished, seal the falcon tube with parafilm, tape the original glass sample vial to the falcon tube and place in the back bin with the red lid in the cold room.
- Clean up from processing or move on to the next sample
Measuring Larvae in ImageJ
Equipment needed:
- Photographs of larvae on PLOMEE One Drive
- ImageJ software
- Can be downloaded here FREE: https://imagej.nih.gov/ij/download.html
- This software is also already downloaded on the two lab computers connected to the scopes
- Google Drive File Stream:
- Can be downloaded here FREE: https://support.google.com/drive/answer/7329379
Setting up ImageJ
- Open imageJ and you can drag and drop images from your Google Drive File Stream folder for the Puritz Lab of Marine Evolutionary Ecology Team
Set Scale
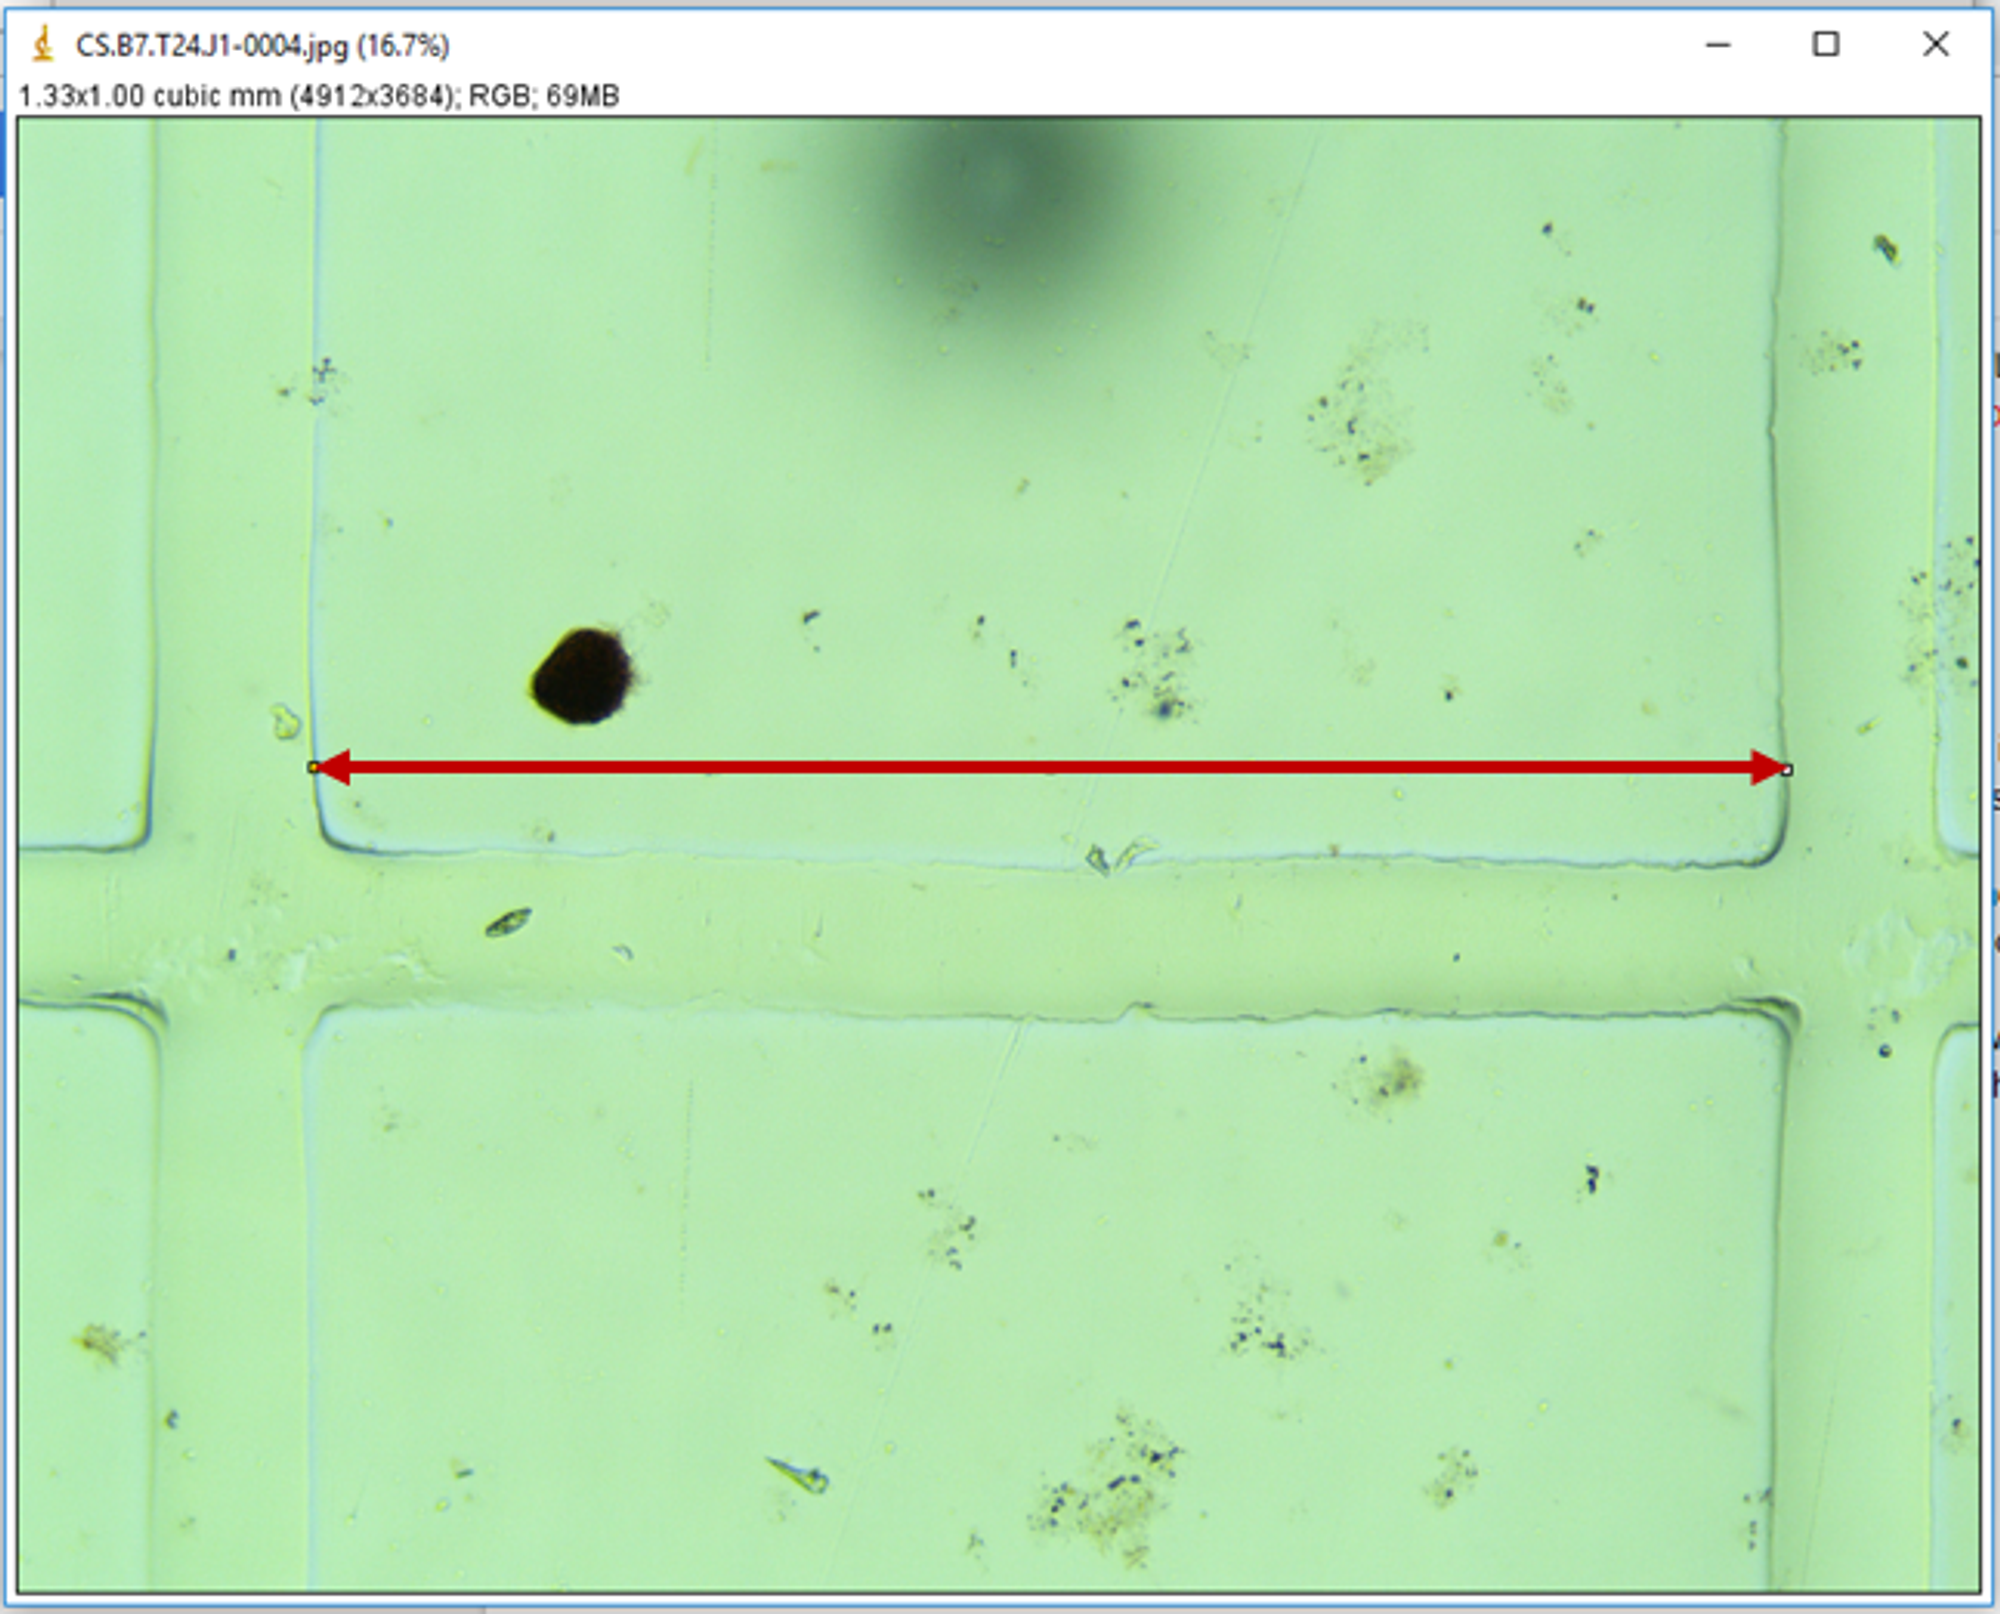
- Once the image is open in ImageJ, you must set the scale that you will be measuring in. To do this, you will use the length of the mesh screen as the scale. Every photograph should contain at least one side of the mesh screen
-
To set the scale, you will use the straight line tool, and, starting at the innermost part, draw the line from one end of the mesh screen to the other, ending at the innermost part
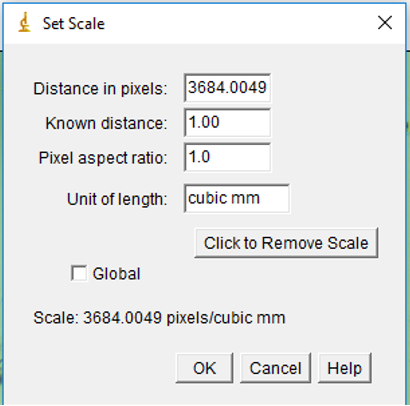
- In the toolbar select Analyze → Set Scale. This will open a box, in which you will enter these values for Known Distance and Unit of Length (do not change values in Distance in Pixels or Pixel Aspect Ratio):
Set Measurements
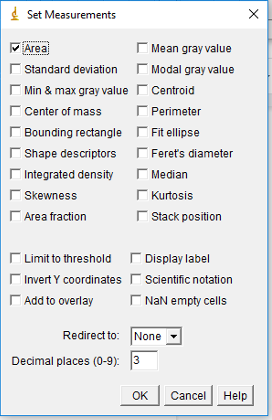
- In the toolbar, select Analyze → Set Measurements
- This will open a new box with different measurement options
- Only select the Area measurement option
Measuring larvae
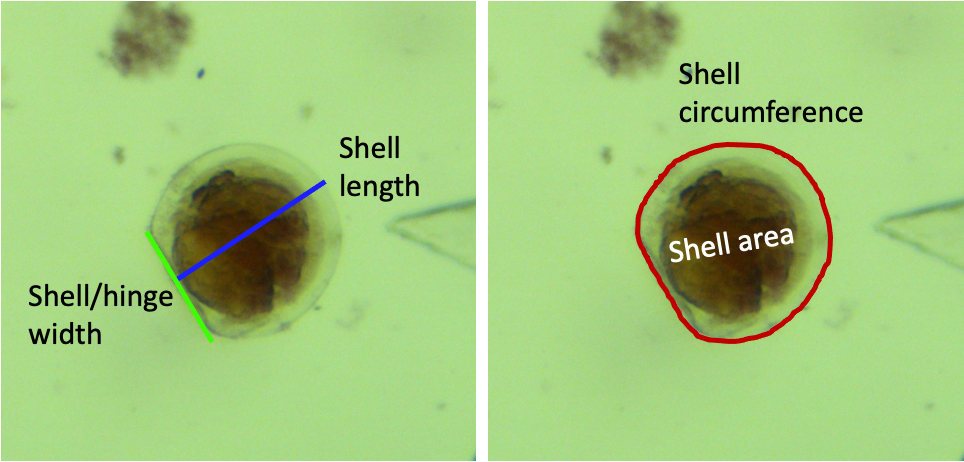
- You will be taking 4 measurements of each larvae:
- You must select your measuring tool, measure the part of interest, then either select Analyze → Measure or use the keyboard shortcut crtl + m (for Mac and PC)
- Shell length: use the straight line tool
- Shell/hinge width: use the straight line tool
- Shell area and circumference: use the freehand tool
- Trace the outside of the shell
- First measure Area: crtl + m
- Then measure Circumference:
- Select Edit → Selection → Area to Line
- Measure crtl + m
- This will generate a length value for the circumference of the shell
- Measurements example for a D-hinge veliger:
-
Measurements example for a rounded veliger larvae:

-
The 4 measurements will appear in this format:
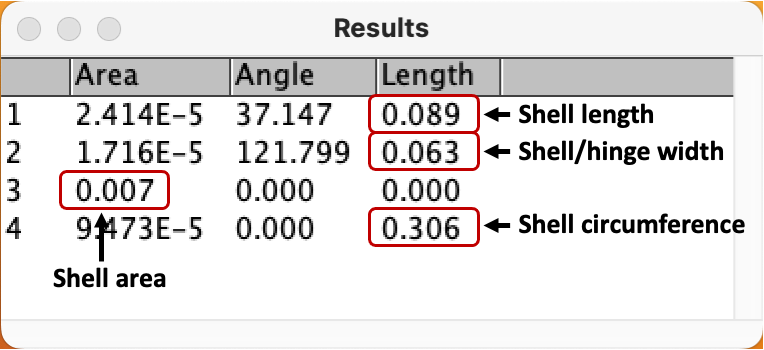
- We are only interested in the highlighted values
- It is recommended that you take the measurements in the same order every time, so that the measurement values are correctly recorded, if not, please make a note and be sure to copy data properly to the measurement data sheet (see below).
Recording measurement data
- Open the larval measurement data sheet in the Google Drive
- Record Sample ID (labeled with the same name as the larval photograph)
- Record measurement data (current date)
- Record measurer initials
- Record larval stage (use image below as reference):
- A: trochophore
- B: D-Stage veliger
- C: Veliger
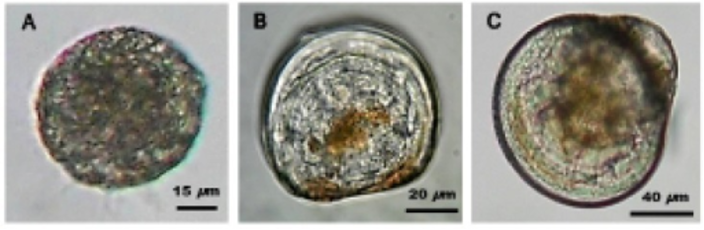
Photo credit: https://openi.nlm.nih.gov/detailedresult.php?img=PMC4382957_devrep-17-337-F1&req=4
- Measurement values can either be manually entered into the Google Sheet (recommended) or copied and pasted
- If copying and pasting, all other values from the results table in ImageJ must be copied and pasted into your Google Sheets workspace first
- Then copy the cells from the column with just the length and circumference values
- In the Larval Measurements Google Sheets select the Shell Length cell and transpose paste the Length Values
- Right click → Paste special → Paste transposed
- This will paste the Shell Length, Shell/Hinge Width, and Shell Circumference values from ImageJ under the correct column heading
- Copy the Area value and paste it in the corresponding Area cell
- Delete the additional area and angle measurements
- If copying and pasting, all other values from the results table in ImageJ must be copied and pasted into your Google Sheets workspace first
